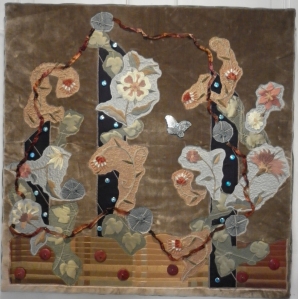
This quilt was started in a play day with our local art quilt group. I had brought several of the silk fabrics that my friend gave me and fussy cut around the flowers and leaves. Nothing seem to work so when I got home, I added the purple rectangles and rearranged everything. The background is a silk velvet. Only the flowers and leaves are quilted since I didn’t want to quilt the silk velvet.Adding the twisted ribbon helped my eye circle around the piece. I finished it by stretching it over stretcher strips.
If you want to see a larger image, click on the photo.
Posted in Uncategorized | Leave a Comment »
After hearing a talk by a traditional round robin quilt, our art quilt group, Capital Region Textile Artists (NY), decided to try an art quilt round robin. Instead of each person adding a new border, we each started with a piece of background fabric and added techniques. The second person added some fabric shapes-the Japanese lady and the fans in my case. The third person added something with paint or markers. My quilt just got some small areas of paint to square off the Geisha fabric. The fourth person added stitching or quilting. Its hard to see, but some grey fabric strips on the left side were added and stitched down. The fifth person was to add embellishments-on mine, she added some yarn with beads tied onto it and stitched down.
We showed the quilts each month with the owner of the background fabric sent out of the room. No one saw their quilt until the Great Reveal in November. It was amazing how each month’s addition changed the quilts. It was also a challenge to try to figure out what to do with something that you had not started. The quilts ended up in various finished stages, but we were all pleased with how they turned out.
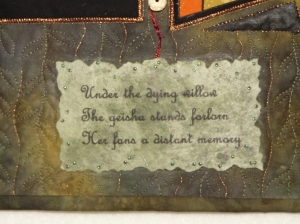
Mine was probably the least finished. I could see the grey fabric and the beaded yarn looking like a willow tree. So I tried to connect that part with the geisha fabric by writing a “haiku” that would combine them.
Under the dying willow tree
The geisha stands forlorn
Her fans a distant memory
I satin stitched with copper thread around the three appliques. Then I quilted the the piece with leaves on stems. I added some more of the beaded yarn to visually connect the tree with the geisha and fans.
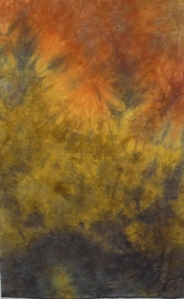
I never would have come up with this quilt by myself and am delighted with how someone else was able to work with the hand-dyed fabric (from Laura Wasilowski) and still have the fabric be a star attraction.
Posted in Uncategorized | 3 Comments »
The Fast Friday Fabric Challenges are being a great source of inspiration for me this fall. The challenge in November was to do a quilt using one shape. In 2003 when I was a Bernina Fashion Show Designer, a company sent me a bag of small, square, silk samples. Of course I save it and when this challenge came along, I thought of using the squares immediately.
I used timtex for the “batting” because I wanted a flat look. After spray basting the black fabric to the front on the timtex, I drew lines on the timtex and with a metallic thread in the bobbin stitched on the lines. This gave me the grid to set up the squares. Each square was fused with the color ranging from light to dark. A second layer of squares was fused to the intersections of the first layer, and a third layer added to intersections of the second layer. I thought that square beads would finish off the piece and by great luck found exactly what I wanted at Joann’s-on sale to boot. It definitely looks better in real life-get more of the shine of the silk. Do click on the photo to get a better view of the quilt.
I may do two more similar pieces varying the grid for the second piece and making total chaos in the third. Stay tuned.
Posted in Uncategorized | 2 Comments »
The Fast Friday Fabric Challenge for October was to use a haiku as a point of inspiration for a quilt, and to emphasize the stitching on the quilt. We didn’t have to create an original haiku, but I found my self thinking in 5, 7, 5 syllable lines constantly. So I wrote this one to use:
Beneath clear blue seas
Diving on a brief visit
Among the colorful fish.
I knew I had the fish fabric in my stash;finding the ocean fabric was serendipity. The coral is made from many batik fabrics. The fan corals were heavily stitched before putting on the backing. The coral and the ocean were then heavily quilted The fish were just outlined so they would stand out and then brushed with some gel glitter. Black sea urchins were stitched on the sand at the bottom, and real shells were added there too.
Seeing the coral and fish while diving is not nearly this colorful unless you have a light or a camera with a filter. But being under the water where you can just stay a brief time is a visit to a fascinating world.
Posted in Uncategorized | Leave a Comment »
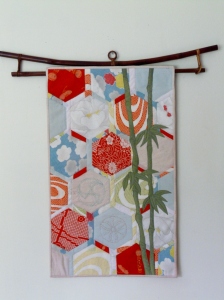
One of the members of our art quilt group, Capital Region Textile Artists, brought some scrap kimono fabric to a meeting and challenge us to make a quilt using them. We finally convinced her that we should be allowed to add one or two of our own fabrics. She also stipulated that it should be in the dimensions of the golden mean-24″ x 14 1/2″ being one possiblity.
I grabbed about 5 fabrics and brought them home wondering how I was going to ever make these disparate fabrics work together. I finally decided to do a background of hexagons and got out the trusty calculator to figure out exactly how big each hexagon should be to come out close to the 24 x 14 1/2 inches. The dumb calculator didn’t work right and it was seriously smaller than the size desired. I finally decided to spread out the hexagons and fill in the spaces between with short strips of fabric left over from the kimono scraps. The whole top is fused to muslin, then the hexagons were satin stitched around the edges with invisible thread. So what started out as a mistake turned into a design triumph. The green silk fabric for the bamboo is the only fabric of mine that I used in the quilt. I found the pattern in a book from our guild library, although I simplified it for this quilt. I also hand stitched Japanese crest designs on two plain fabrics. I had bought the hanging rod several years ago at a store called Ten Thousand Villages and this seemed the perfect quilt to use it with. I learned a lot about how dissimilar fabrics can play very well together and plan to hang this quilt in a place I can enjoy every day-which probably means that something else comes down!
Posted in Uncategorized | 3 Comments »
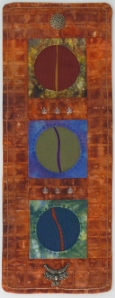
The spring challenge from my quilt guild (Q.U.I.L.T., Inc) in Delmar NY was to make a quilt that included something circular. I had some silk fabrics that have been gestating for several years; the kind of fabric that is so precious, you hate to cut into it. So I gulped and went at it. Each square is made from purchased hand dyed silk. The orange background fabric was purchased from a friend and it has a textured weave to it. I wanted to make the circles more interesting, so I piece in a thin strip of a contrasting color. Beads were added around each circle and metallic ornaments from my “collection” were stitched on. I had made a twisted cord planning to add it to the outside edge but it didn’t look right there. Couching it just inside the edge made a faux border that I did like. Unfortunately, it didn’t win a prize in the challenge contest (the winners were all much larger quilts-coincidence or does a large quilt make a larger statement?), but I’m very happy with it.
Posted in Uncategorized | 1 Comment »
The June challenge for this group (http://fastfridayquilts.blogspot.com/) was to make a quilt using a fungus motif, split complementary colors and texture or dimension. I made the shelf fungus by fusing the top to a bottom fabric, then stitching each on one edge to the brown “bark” that I had scrunched and textured by stitching. I liked using unusual colors instead of realistic ones, but the piece didn’t please me enough to keep, so everything got unstitched, and I got my favorite brown fabric back again to use in another quilt.
Posted in Uncategorized | 1 Comment »
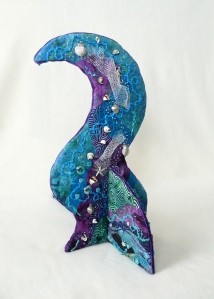
A local art quilter, Kriss Gregson Moss ,http://www.krisgregsonmoss.com/ gave a lecture at our local quilt guild and showed some of her 3 dimensional fabric sculptures. Last month, five people from our art quilt group here in Albany NY took a class with her on this technique. Each of us designed our own project and got a good start on putting it together.
This fabric sculpture is made from two pieces that have slits which fit together. Each piece is made of two fabric pieces-composed of fused fabric, beads, shells, silver netting, and yarn-that are almost identical. The bottom two pieces were stitched together by machine, turned inside out, and a piece of foam core slipped inside. Then the bottom was hand stitched and a thin purple velvet ribbon glued around the edge. The top piece had to be sewed together by hand along the edges and the purple ribbon on the edge was pinned on through the foam core.
I started with the blue, green, turquoise,purple colors thinking of the ocean Fortunately I found lots of stuff in my stash along that theme to embellish with-maybe too much I think now. It was alot of effort to get the sculpture together but I was pleased with the result in the end even if design wise it is over the top! In the photo, it seems to resemble a seal.
Posted in Uncategorized | 4 Comments »
This is the second of my collages using the purchased hand-dyed damask napkins. (See the first at the bottom of my blog). It was started during a play day with our art quilt group in Albany. I had brought many of the elements used but it didn’t get a focus until I was leafing through a magazine and came upon the interesting “Source” graphic. It was glued to the napkin then covered with two layers of sheers to soften the whiteness. I added objects that I thought pertained to the word-like the small goddess doll at the right, the spiral images, and the gold and silver pin-is money the source of all evil?? The feathers just looked right so they were glued down with gel medium too.
The napkin was quilted to a piece of brown felt and attached to stretcher strips. I ended up framing this with a 1″ wide corner molding so only the edge showed. I like the way it finishes the piece, but it was definitely a pain to do-even with my husband cutting the molding for me.
Posted in Uncategorized | 1 Comment »
Click on photos for larger image
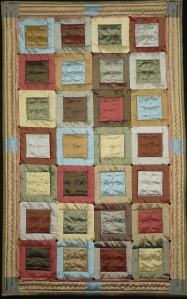
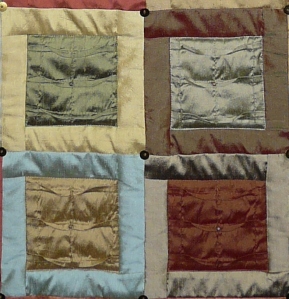
This is my third quilt that I have made using the silk fabric from my high school friend. I found a whole set of samples in different colors that had strips of tucked fabric alternating with strips of plain fabric. I cut the strips apart and used the tucked fabric for the center of the squares, and the plain fabric for the outside. I quilted around the inside squares but just added the flat sequin and the bead at the corners of the larger squares. My friends suggested adding some other beads I had to the center of the tucked square-good advice.
The plus of having all these fabric samples is that I have a large variety of fabrics to use. The minus is that I don’t have much of any fabric. I found the gold fabric for the border, but needed to piece it for the correct length. That gave me the idea of adding another color square in the middle of each border. Of course I didn’t have enough fabric for the corner squares so I rummaged some more to find another color to use. The binding came from a totally different fabric that was greenish-gold. The restrictions of fabric size gave me a great opportunity for creativity in using different colors!
I hope the sheen of the silk shows in these photos because it really glows and looks terrific on my wall. This one is a keeper!
Posted in Uncategorized | 2 Comments »
